Die Übersetzung ist noch in Bearbeitung.
Introduction[]
This tutorial is a continuation of Lua Scripting Tutorial (Beginner 1). It builds on the skills and knowledge you will have acquired in Beginner 1, such as downloading and running a script from the web and using an output window.
Beginner 2 Goals[]
In Beginner 2, you will work with some scripts that require the select interface. This will help us lead up to being able to look at and modify Lua scripts for the first time. Although you will not do much substantial modification of scripts in this tutorial, it will set the stage for learning all about Lua commands
in Beginner 3. By the end of this tutorial, you should be able to:

This script requires the select interface!
- Run scripts that require the select interface
- View and understand error messages related to the select interface
- Open and view a script
- Modify an existing script and save it
- Understand how to use two basic commands: print and select_index_range.
Using the Select Interface with Scripts[]
As we mentioned in Lua Scripting Tutorial (Beginner 1), some scripts require the use of the select interface
. You can usually determine whether this is the case for a particular script that you get from the web by looking carefully at its description.
Using the select interface
In the new interface in Foldit, you can select one or more segments of a protein. These selected segments become the target of all the in-game controls you use from then on -- likewise, if you run a script, only these selected segments will be affected. Of course, you can always "deselect" these segments and select new ones if you want!
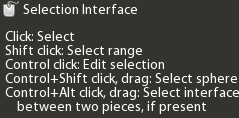
Like many tasks you can do in Foldit, it is possible to select and deselect segments by hand with your mouse or within a script by using a special statement. Let's see how it works to select segments by hand:
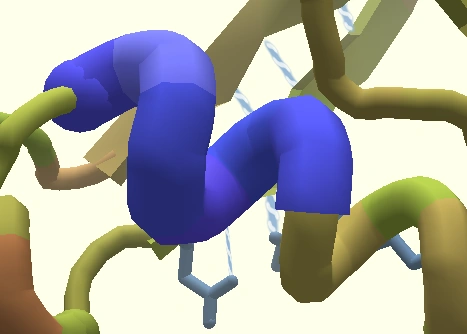
Segments turn purple when they're selected.
- With the game open, download theBeginner Rebuild SCRIPT 2.00 from the web.
- Switch to the “New Interface” if you're not using it already. You'll always need to use the new interface if you run a script that requires select, but don't worry – if you hate it, you can switch back to the old interface in between running scripts.
- We want to select about five or six connected segments of the protein. Hold down shift and click on the segment where you'd like to start and then click on the segment where you'd like to end. Or you can use control shift and drag to select the segments. They will puff up and turn bright blue/purple!
- Make sure all those segments are connected to each other and that you have no other segments selected. Then open an output window and go ahead and run the script.
What is this script doing? You might notice that it looks pretty similar to our other automated rebuild script. In fact, we'll find out that it is almost identical – the only difference is that in our new script, we can pick our own segments to auto-rebuild, whereas in the earlier script, segments 1-10 were picked for us.

Directions for using the select interface
Oops! Forgetting to use Select[]
In Beginner 1, we looked at an output window
. Let's see an example of why this little window is so important when you're running scripts by intentionally making a mistake to see what happens.

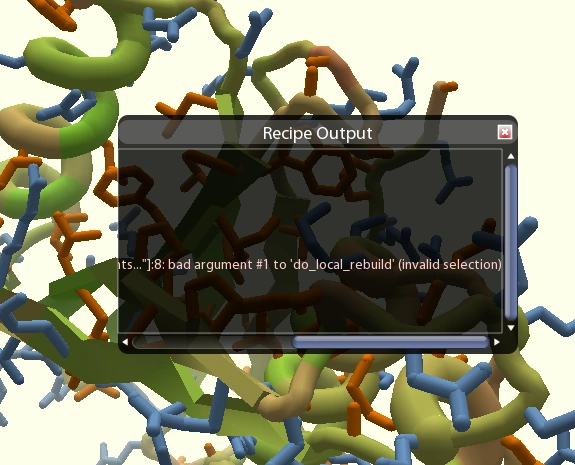
The error we get when forgetting to use select isn't very informative!
- Make sure that there are no segments that are selected – if there are any, deselect them using the same shift-click technique you learned.
- With an output window open, run the script again.
- What happened? You should see an error message in pink text in the output window. Although it's not very informative, it does tell us that we made an error by not selecting any segments ("bad argument ... (invalid selection)").
- Go ahead and fix that error by selecting connected segments and then rerunning the script!
The error message explains what we did wrong, but note that it isn't always very informative – in fact, for non-programmers, it can be downright confusing! There are many different messages you might get – for now, you should just be comfortable understanding error messages related to select and knowing how to fix them.

Editing a script
Looking at Your First Script[]
In Beginner 1, we noted that a script is like a recipe for baking a cake – a series of simple, step by step instructions that need to be followed in order. For a cake recipe, our instructions might be “sift flour”, “beat eggs”, “mix flour and sugar” and so on. For a fold-it script, our instructions, which we call commands, might be “wiggle”, “shake”, “add bands”, “rebuild”, and so on. However, we need to state these instructions in a very specific way that looks complicated to humans but is simple to understand for computers. For example, “add bands between segment 5 and 10” might have to be stated: band_add_segment_segment(5, 10).
Editing a script
So let's open a script and see what these commands look like.
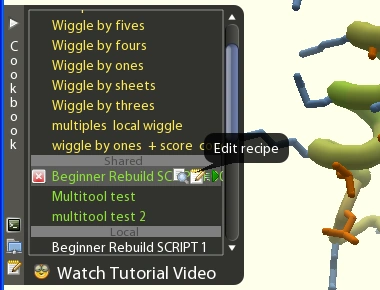
- We're going to look at our first beginner script, Rebuild SCRIPT 1.00 http://fold.it/portal/recipe/1929, so locate it in your list of scripts (or download it if you haven't already).
- Hover over the script with your mouse and click the little icon that looks like a notebook ("edit recipe").
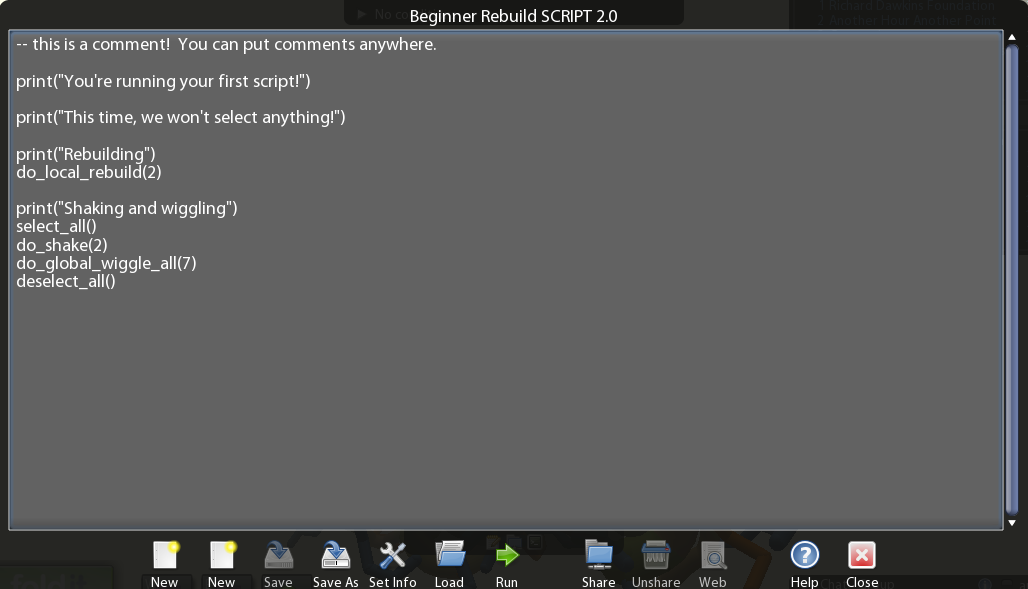
- You will see a plain text window pop up over the top of foldit.
- Take a close look and see if you can figure out what is going on in the script. You are not going to understand it all, but you should notice the words “rebuild”, “wiggle, “shake”, and the like. You may also notice phrases that you saw pop up in the output window! They will look like this: print("you're running your first script!"). Finally, look closely at this line: select_index_range(1,10) -- what is happening here?
- Close that script and now open the second beginner script again. Study the text. Can you see how the two scripts are different?
Edit a script using a plain text editor.
The two scripts are identical except for two lines. Our beginner 1 script had these lines:
deselect_all()
select_index_range(1,10)
which, as you can guess, tells the computer to first deselect anything that is currently selected (wiping the slate clean -- always a good idea in a script that will be using select, just in case the user has some segments selected by mistake!) and then to select segments 1 through 10 on the protein. Our beginner 2 script is missing these lines. Therefore, it did not work unless we went in and selected segments by hand.
Modifying a Script[]
So you've looked at the text of a script and although it doesn't all make sense, you have a general idea that it consists of a series of commands that the computer executes step-by-step on your protein. Let's see how we can do this ourselves by modifying an existing script.
1. Open thesecond beginner script if you don't already have it open.
Comments[]
2. Click on the second line of the script, right below the line that starts with "--". Type the following line:
-- look ma! I'm writing my own comment line!
Anywhere you like in a script, you can write yourself a little message (called a comment) by starting it with "--" (two dashes). This is helpful if you want to remind yourself what you've done in the script or if you want to tell other folks (who might download your script) something. You can write absolutely anything you like in a comment line (keep it clean, folks!) as long as it starts with "--".
Print Command[]
3. Press enter and now type another line:
print("this is how we print to the output window!")
As we noted before, this is how we print text to the output window -- it's not very important now, but later we'll find out how we can provide users of your script with important data about the protein itself, like scores of individual segments and other information. Go ahead and add another print line with your own message in it. Follow the exact same format as you did above -- don't forget the parentheses and quotes around your message, and don't include any spaces except inside your message itself: print("like this").
Deselect_all Command[]
4. Now we're going to go ahead and fix the script and eliminate any possibilities of getting an error message by adding select commands. Press enter and type:
deselect_all()
Again, it's usually a great idea to use this command in any script that uses select. It takes any selected segments and deselects them. That way, any user-selected segments don't cause problems for your script! For example, if we want our script to rebuild segments 1-10 but the user has already selected segment 20, the program may not work, because it's not possible to rebuild disconnected segments! Unlike in our print command, deselect_all doesn't need anything inside of the parentheses and it doesn't need quotes. Just type it exactly as above each time you use it.
Select_index_range Command[]
5. Now that we've "cleared the slate" by deselecting, let's select some segments. Remember that we had this line:
select_index_range(1,10)
in our first script. That selected segments 1 through 10. Let's change it and select segments 5 through 15 instead, so press enter and type:
select_index_range(5,10)
You can see how this command, select_index_range, works. Unlike deselect, you need something inside of the parentheses. Actually you need two things, the segment to start at and the segment to end at. Place a comma in between them.
6. To practice, let's do one last thing: press enter and type the commands to deselect everything and then select segments 8 through 14. It's kind of silly to select, deselect, and select again, but it's good practice for learning how to type in these commands.
Finishing up: save, run, and handle errors[]
7. Let's go ahead and save your brand new exciting script! Click "Save As" at the bottom of the script window. Save the script under a new name -- perhaps "My first script?" and add a description if desired.
8. Now you can run your script as usual. Make sure you have an output window open. If all goes well, you will see the text you wrote in those print lines pop up in the output window, along with some other info about commands that are being executed by the script. You'll also see parts of the protein turn purple as they're selected and deselected. Then the script will rebuild segments 8 through 14, shake, and wiggle out. If your script doesn't run correctly, check the output window -- you should have an error message! See if you can figure out what it might be telling you (if not, that's okay) and go back to your script and look it over carefully, line by line. Make sure you've typed everything properly, you don't have any weird keystrokes, and you don't have any spaces except in between lines and inside the text of your message and comments. Fix the errors and run your program again.
Putting it all Together[]
If you've made it through this tutorial, you should feel comfortable working with select, viewing the text of scripts, and making simple modifications to scripts. You should also have learned about writing comments in a script, as well as know how to use three important commands: print, deselect_all, and select_index_range.
There are two directions you can go from here. You can continue on to Beginner 3, in which we learn most of the other commands that will help us wiggle, shake, rebuild, band, and do all sorts of other fun things with proteins, culminating in being able to write a complete functional script that does just about anything you can imagine.
Or, you can go ahead and go off on your own, picking up commands as you go along -- returning to Beginner 3 later if desired. If you choose to go this second direction, you may want to look at the list of commands at Lua Scripting and download some other people's scripts. Read through their scripts, follow output as the scripts run, and see if you can figure out how it all works. This will provide the building blocks for writing your own scripts.
Either direction you choose, you may also want to check out the Lua Scripting Tutorial (Intermediate, which provides a lot more material for working with standard programming structures such as loops, conditionals, and variables.
Quellennachweis[]
Der Original-Artikel befindet sich hier.